Monday, April 29, 2013

Cleaning-out the demo quiver...

Time to let go of some of these demo boards....

Nova 9-6 18x23x14  3-1/8   $599

Nova 9-6 18x23-1/8x113-3/4  3   $599

Hybrid 5-fin 6-8 13"x20-1/2"x15"  2-5/8"  $465

6-4 Stubby 2+1  14-1/2"x22"x16"  3"  $399

Email me for more pix and info tp4surf@gmail.com  PayPal, Visa, MC, Amex accepted

Friday, April 26, 2013

Sweet fins...

Here is the Tyler Warren Quad Set from True Ames:


There are a couple of things worth mentioning about these beautiful fins. The rear fins have a slight amount of foil on the inside surface. This produces a smoother feel, especially during turns. These "80/20" foiled fins seem to work best when the rear fins are set closer to the stringer. The Future-based fins have a shallower base on the rear fins to accommodate the thinner part of the tail where they are placed. FCS fins don't have this problem. These fins are a sandwiched bamboo/Hexcore construction, keeping overall weight very low. This particular set is destined to be used on 5-4 Mini-Widget currently being glassed.


Wednesday, April 24, 2013

Wall Hanger, Part 2...

Finally got its turn on the glassing rack...


We spent a lot of time adjusting the color before mixing up the final batch. I wanted a color that would be just "a shade" darker than hi usual Ice Green. Ray takes a piece of scrap foam and a piece of scrap cloth to test how the color will look on the blank. Needless to say, I'm pretty happy with the results...at least so far.


Typically, the bottom of the board is laminated first, with the cloth lapped around the rails. The "lap" is then evenly trimmed on the deck side. Next, the deck will be laminated with one layer of 6-oz cloth and one layer of 4-oz cloth, lapped onto the bottom and trimmed. Board will then be ready for hot coating.

Thursday, April 18, 2013

Beach-campin'...

Just spent a few days at my favorite beach campground. I'm totally sold on the whole travel-trailer thing. I've tent-camped on this point before and its not much fun, especially with the wind. Pretty windy this day, too, and the surf was blown-out. I hung out inside, drank coffee, read my new Surfer's Journal and watched the ocean. SJ has a great article on Aussie shaper Tomo. Had me reading Lindsay Lord's book Naval Architecture of Planing Hulls. Same book that inspired Bob Simmons. Interesting stuff...in a shaper-geek sort of way.

Saturday, April 13, 2013

Let's make a Mini-Widget...


 Basic Shape:  The Mini-Widget is a variant of the “mini-Simmons” design, and is a shape that lies somewhere between my T-Belly, belly board and my Widget mid-size shape. The common ground here is maximum planing surface and volume in a very short length. Wide-tails are notoriously hard to turn, so I like to use single-or double-wings in the tail (depending on board length) to loosen things up a bit. The diamond-tail also helps here as well. The T-Belly and the Mini-Widget also share some Simmons-esque features, i.e. belly in front third, flat in middle and progressive tail-concave through the fin array. The T-Belly and the Mini-Widget also have a beveled rail that starts just in front of the fins and continues out the tail. The bevel increases the rail-rocker in the back third of the board (another turning-aide). See Widget   T-Belly

Getting started:  I design all new shapes using Aku shaping software, and the Mini-Widget was no exception. While I handshape probably 95% of my boards, using the software has three advantages: (1) I can place the profile of my new shape over the profile of the blank I intend to use to see if it fits or if I need to make adjustments to rocker when I order the blank, (2) the software will print out a full-size outline which I’ll use to produce the template for the board, and (3) the software has a feature that allows me to view the shape in 3-d from all angles.

rough-cut template
The Template:   I print out and trace the outline on a piece of Masonite. Since this is a “spin template”, about 2/3 of the outline curve is on one side (nose to just past middle) and 2/3 of the outline curve is on the other side (tail to just past middle).
I’ll be able to use this same template when shaping MWs a little longer or a little shorter. 

Finished  spin-template


Ordering the blank:  This shape calls for a very wide outline with a very low rocker curve. While a fish blank has the width, thickness and full nose I need, surprisingly it doesn’t have the low rocker numbers I’m looking for. While I could order a fish blank with less rocker, the amount of decrease in nose rocker I need is so high, that it would require extra stringer thickness to prevent the blank from “springing-back” to its original shape, adding weight to the finished shape. Instead I chose an 8-6EA, and after cutting off about 18” from each end, I had a rocker curve very close to what I needed, enough width to accommodate the full outline, and could stick with the light 3/16” bass stringer.

After trimming off both ends, and cutting blank to length

Finding the best location for outline on the 86EA. 
Outline cut

Shaping:The MW is a challenge to shape, with the multiple bottom-contours and the “spooned-out” nose on the deck. Main consideration is to try to take most of the excess foam off the bottom. Foam blanks become less dense (softer) as you plane away the excess foam. You want to leave the deck as dense as possible to alleviate excessive heel denting (“Blue” density foam was chosen for this reason as well). The shaper also has to keep in mind the desired thickness of the finish board (in this case 2-5/8”) and not exceed it.


Finished blank showing belly flat middle
Finished blank showing tail concave and rail bevel
Finished blank showing belly in nose
Finished Blank:  This blank will receive full resin-tint color, which means the blank itself had to be sanded with progressively finer grit until it had almost a polished look. After the blank is finished, I mark the fin placement and place it in the rack where it waits its turn. Attached to the blank is the production order which calls-out the glassing schedule, color, logo placement and fin-box type.

To be continued...

Thursday, April 11, 2013

Story of the "Wall Hanger"...

I decided it was time to build a board strictly for appearance, which could be displayed in our home. My wife has used a "beachy" theme to decorate our small house in Ojai, CA, and she felt a surfboard would be a nice addition. My first impulse was to build a balsa board, with redwood stringers, but building a chambered balsa board is not only very labor-intensive, requiring access to tools typically found in a cabinet-makers shop, but very expensive (10' raw blank=$800!). And, given the wall-space that this board is to occupy, a sub-8' board would have to do. I settled on building a 7-6 egg, with multiple (5 to be exact) stringers. I think the egg is a classic shape, that probably looks better than it performs. And, with 5 stringers, this board will be a true mini-tanker, which should help to keep it on the wall and not in the water. So, I visited my friends at Fiberglass Hawaii in Ventura and ordered the blank. Here's what I started with:


The notes scribbled on the bottom indicate who ordered the blank, the stringer info (thickness, location and material), and finally, the rocker adjustment. The note "+(2)1/8CD 3-1/2 out" means two 1/8" cedar stringers, each offset by 3-1/2" from center. Other trivia you may or may not know: the blue on the nose means that this is a "blue" density foam and "80H" is the blanks name, while "MIL" are the initial of the person who poured the foam. The "natural rocker" of this blank is a little too flat for my taste, so I had USB add 1/4" of nose rocker in the last 24" of the nose.

Here's the blank after "skinning" and after being cut to length, which in this case is 7'6"
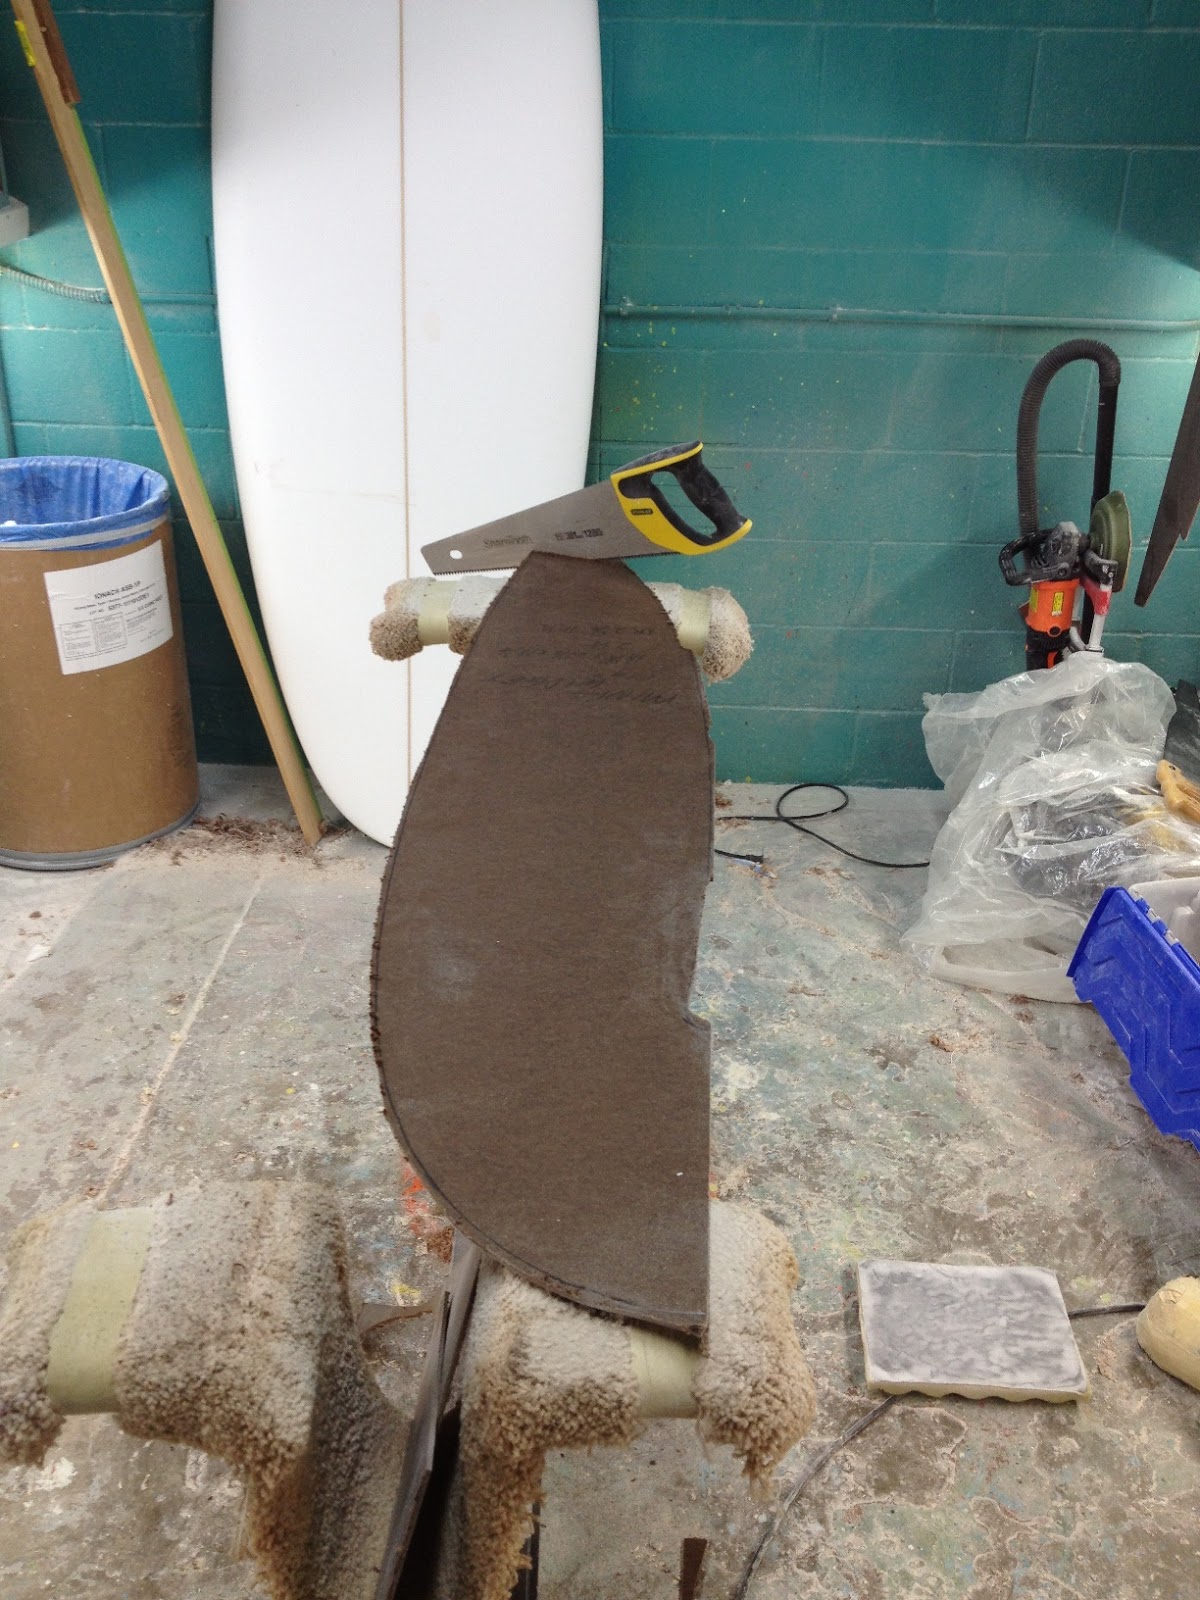
 After planing-down to within 1/8" of the final thickness and foil, its time to template the blank. This is my favorite egg template and the one I use for the Nomad shapes.
Here, the outline has been cut and trued-up. At this point, I make the final rocker adjustments and add any bottom contours, such as concaves or V.
One last check of the rocker followed by any necessary tuning, and then I shape the rails.
With the rails shaped, its time to finish-sand the blank. Since foam is softer (less dense) than wood, there is a tendency for the stringer to protrude above the foam after sanding. So, after every sanding, each stringer has to be carefully planed down so that it is slightly lower than the foam. This process repeats until all scratches have been removed, and the stringers are flush with the foam. Because this blank will receive a resin tint, it has to be finished to almost a polished look. Any nicks or scratches, however small, will appear darker in color. Multi-stringered boards take almost as long to finish as to rough shape.

At last, here's the finished blank, ready for glassing. This board will be done in the classic coke-bottle green.

Tuesday, April 9, 2013

'nuther Nova...

The Nova is my most popular longboard model, and for good reason. It has a wide wave range and can be ridden as a single-fin, 2+1 or twin-with-trailer (a la Infinity Cluster-V). I build this model from 9'0" to 10'6", with thickness depending upon rider weight and experience. Here's the latest in the popular "Ice Blue" Tint finish.


In an earlier post I mentioned the option of choosing stringer glue color on custom boards. This board was ordered with a 3/8" basswood stringer and dark blue pinline. Blue stringer glue was a no brainer...


No extra charge for the fancy pinline corners and the  "through-the-box" leash loop.


Board's dimensions are 9-6, 17-7/8" x 23-1/8" x 13-3/4"  3-1/8" thick.

This board was finished last week. Next up is a 5-stringer 7-6 Nomad and a 5-4 Mini-Widget Quad. Photos coming soon....